Accurate polar alignment
Here is a little video showing how to use a long exposure camera – video camera or webcam – to get an accurate polar alignment quickly and easily:
http://dai.ly/x12h5jo
The video is more or less self-explanatory, but here is some text:
The method needs ‘long’ exposures to spot a target marker star at around magnitude 9’ish, and also to see star trails as the RA axis is rotated. For the Samsung SDC435 integrating video camera, used in the video, ‘long exposure’ means about 0.5 seconds. The other requirements are that the pole star, Polaris, is visible, and that the RA axis can be rotated almost full circle in second or two.
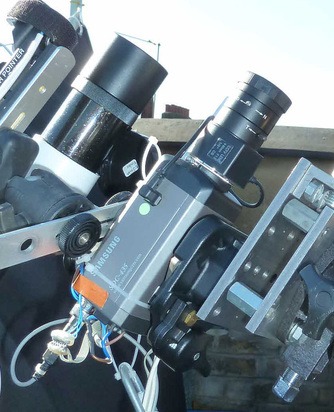
The camera should be fitted with a wide angle lens to start with, the wider the better, and a narrower field of view lens (3 or 4 degrees fov) for the end. A zoom lens is ideal – the video was made with a cheap (£20) C/CS manual zoom lens 6 to 60mm focal length.
The basic idea is to first align the RA axis with Polaris, and then to make a correction of around 40 arcminutes, using a marker star and a convenient asterism, to set the RA axis to the celestial pole.
First off, set up the tripod and mount (an EQ2 in this case) with the RA axis roughly pointing to Polaris. Attach the optical kit and camera(s), and it is probably a good idea to align a finder scope with the camera. With the lens at its widest fov setting, move the camera in DEC and RA to put Polaris in the centre fov. Now swing the RA axis to and fro, as far as cables permit – you should see Polaris describe parts of large circles on the monitor or computer screen. The smaller the circle, the closer the RA axis is aligned to Polaris.
Using the mount’s Azimuth and Elevation adjusters, move the mount so that the size of the Polaris circles on the monitor decrease in diameter as the RA axis is swung to and fro. On the EQ2, the Azimuth adjuster is the big bolt beneath the mount, and the Elevation adjuster is the tommy bar screw adjuster at the bottom of the RA axis, and the locking handle to the side.
Trial and error is as good a way as any to make the adjustments – there is a logic, but it is easily confounded if the camera provides an inverted image L/R or U/D, or if the camera is rotated on the attachment plate. It gets quicker with a bit of practice.
If you have one, zoom in with the lens as the Polaris circles get smaller. If Polaris moves out of the fov, adjust the camera in DEC to bring it back. If this cannot be done, then the camera is not sitting square on the mounting plate and will need to be mechanically adjusted to sit properly. This can be done either through shims or by fabricating an adjustable bracket.
Keep on adjusting the mount’s Azimuth and Elevation controls until Polaris remains stationary on the screen as the RA axis is moved. When this is achieved, the RA axis is accurately aligned to Polaris. On the EQ2, flexing of the mount proved to be the limit on this, but getting the axis stationary to within the image size of Polaris is possible.
The next step is to offset the RA axis from Polaris, since Polaris is not at the Celestial Pole. The star map and image below shows the
sky region near to Polaris – the faint stars are between magnitudes 8 to 9. The offset needed is about 40 arcminutes, which is easily adjusted for at this image scale. The chart shows that there is a faint star directly opposite Polaris to the Celestial Pole, and at the right angular distance, that can be used as marker to move Polaris.
The Skymap planetarium program identifies the marker star as TYC 4628-17-1 at magnitude 8.14. I turned on the SSNR3 noise reduction feature of the SDC435 to show the star more clearly on the video (the SSNR3 feature looks and feels like an exponential
moving average of previous frames). The co-ordinates of Polaris and the marker star are:
Polaris J2000: 02h 31m 49s - 89d 15m 51s Apparent: 02h 48m 59s – 89d 18m 59s
TYC 4628-17-1 J2000: 02h 34m 33s – 88d 28m 16s Apparent: 02h 43m 01s – 88d 31m 25s
And the angular separation of the two stars as 47m. This separation is almost exactly the separation of Polaris from the Celestial Pole (44m). Unfortunately, the two stars and the Celestial Pole do not quite lie on the same line of constant RA, so a line through the two stars does not exactly point towards the Pole, but it is not far off.
Mark the position of the faint marker star on the monitor, and then adjust the Azimuth and Elevation controls so that Polaris is moved to the marked position, as shown below:
When this done, alignment is complete !
